Base price: $25.
2-5 players.
Play time: ~30 minutes.
BGG Link
Buy on Amazon (via What’s Eric Playing?)
I don’t really own a ton of cooperative games (or at least, not a significant percentage of my collection is cooperative), especially not short ones. There’s Hanabi, sure, but that’s about the shortest it gets. Burgle Bros. can take an hour, usually, Mysterium‘s in the same part of town, and Pandemic or Marvel Legendary can go even beyond that, depending on how the game goes.
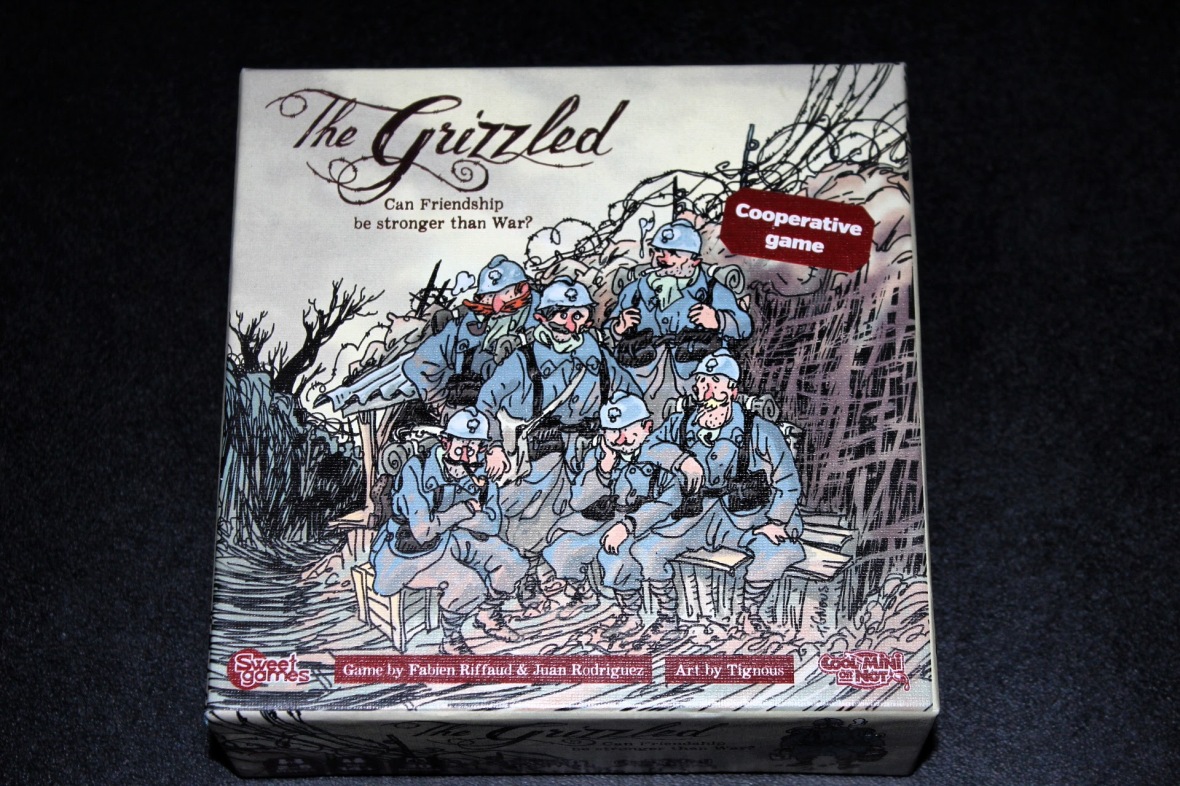
That, in part, is one of many reasons I’ve been really excited to pick up The Grizzled, a fantastic little game about WWI (or, at that time, The Great War, since it didn’t really make sense to call it World War I as though you were pessimistically expecting a WWII). In this game, you can be up to five of six friends all conscripted into the French army who can fight in the war and either bring peace or be commemorated for their sacrifice. As the game asks, is friendship stronger than war? Keep reading and find out!
Contents
Setup
Setup is not too hard. There are six characters, each with a different name and symbol. Each player should pick one, and since the symbols are all different there’s really no major reason to pick one over the other, though personally I always pick Gaston because, well, no one fights like Gaston. That’s a personal preference, sure, but other than that I’d choose the person with the best mustache. Make sure each player has their card four-leaf clover-side up (that’s called their Good Luck Charm). Other than that, you’ll notice there are a bunch of cards (including one with a statue, and one with a dove) like so:


Shuffle the deck of cards and put 25 on top of the Peace card (the card with the dove) and the remainder (should be 34) on top of the Monument card. If you would like to make the game harder, put 30 on top of the Peace card and 29 on the Monument card. This is typically referred to as “Veteran” difficulty. I will refer to these piles from here on out as the Trials deck and the Morale deck, respectively.
Now, you should have a mission leader token and some tokens with the starts of speeches on them (Speech Tokens), and other tokens with a coffee on the back (Support Tokens). The number of Speech tokens you need depends on the number of players you have, like so:
- 2-3 Players: Use 5 Speech tokens.
- 4 Players: Use 4 Speech tokens.
- 5 Players: Use 3 Speech tokens.
Put the remainder back in the box, as you won’t use them this game. For the Support Tokens, give each player a Left and a Right, then shuffle up the others and deal them out randomly, but do not show your Support Tokens to anyone, ever. Naturally, as you might assume, with two or three players you won’t need the 2 Left or 2 Right Tokens (as that would be silly). Once your setup looks like this, you should be ready to begin:

Good luck.
Gameplay
So, it’s The Great War and you’d like to survive. How do you do that? By overcoming the various trials that the war will present. If you can survive the various trials and overcome them, you’ll eventually reach the Peace. If you fail, well, the Monument will reveal itself and the world will at least appreciate your sacrifice, not that that’ll mean much to dead you. That’s a pretty quick summary of how The Grizzled is played, but let’s dig in a bit deeper to figure out how it works.
Step 1: Choose Mission Difficulty
The Leader for each round (the player with the Mission Leader token) will choose a Difficulty for the upcoming mission. The Difficulty is given as a number between 1 and whatever you want, though I’d recommend never going higher than 3. This is how many cards each player will draw from the deck (in addition to the cards that are in your hand, currently). Note that the first mission’s Difficulty is locked at a minimum of 3. So for the first round, every player will receive at least three cards (and my personal opinion is at most). In case you’re interested, you should deal the cards to players one card at a time, in order, rather than each player drawing three cards at the same time (and there are reasons for that). This does mean that some players might not get the full number of cards, if you empty the Trial Deck while dealing out cards.
Step 2: Go on the Mission
Here’s the fun part. Now you’ve got all these cards in your hand, you need to play them. Sounds easy enough, right? But you’re waiting for the Hanabi-style twist, and you’re correct to do so. You’ll note that there are six different threats:
- The Night
- The Rain
- The Snow
- The Gas Mask
- The Whistle
- The Shell
And they’re present in some number (usually at least 2) on every card in your hand. You must play cards such that there are never three cards with the same threat active. This is complicated by the fact that you don’t know what’s in your opponent’s hand (and you should not ever tell anyone what cards you have). If you ever play such that there are three active threats of the same type (three cards with snow, for instance), you instantly fail the mission. I’ll talk more about what failing the mission means shortly.
You might think “that’s not so difficult”, and you’re wrong. There are many different threat cards:
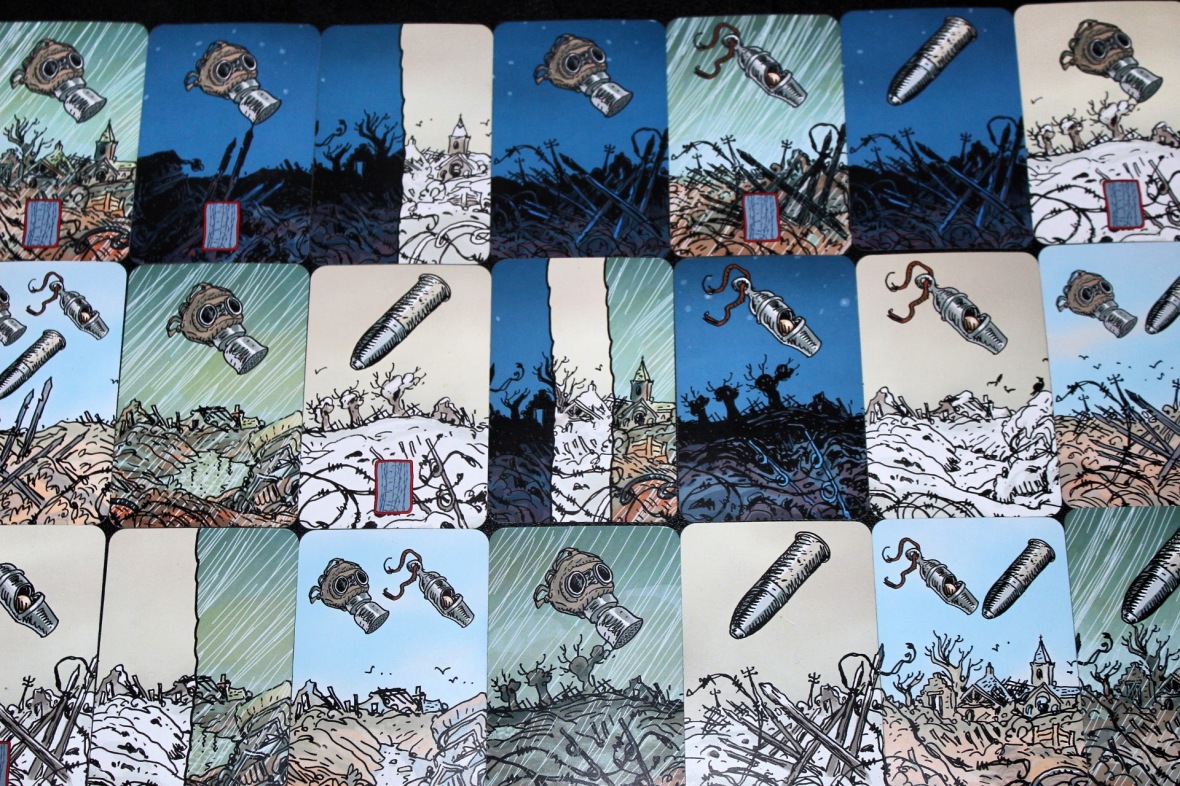
And you’ll note that some have a card on them with a red outline. If you play one, you’ve activated a Trap Card (yes, you just activated their Trap Card, yes, Yu-Gi-Oh meme, etc) and must immediately draw and play another card from the Trial Deck. Note that this can (and often will) cause you to instantly lose the Mission, so … play at your own risk? You might want to ignore these for your first few games (and, indeed, it’s highly recommended). Additionally, some Trial Cards are far worse than others:

Make peace with your gods. On the plus side, any Good Luck Charm or Speech can remove it?
If the Trials weren’t bad enough, you occasionally have no choice but to let the war get to you, and that inflicts a condition on you known as a Hard Knock. These are also cards you can play, but they inflict a negative penalty on you or others when played:
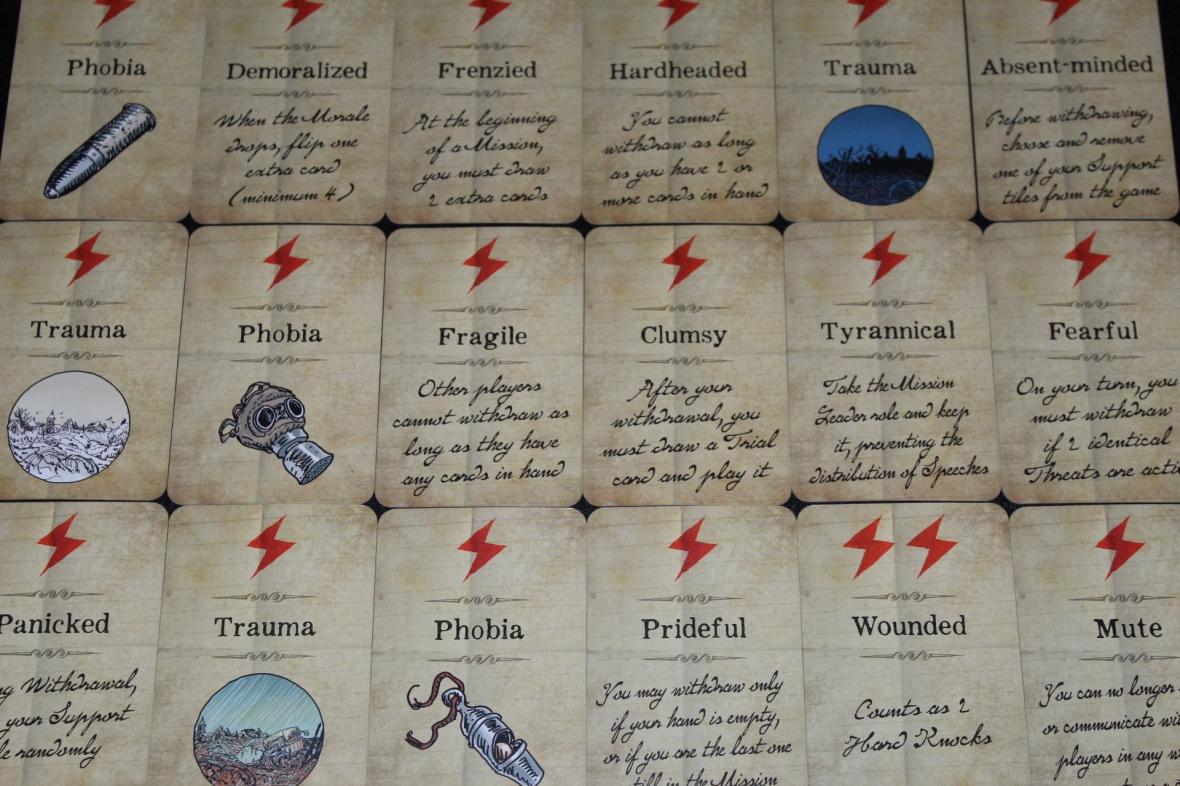
Now, you’ll notice that some of the Hard Knocks are Traumas or Phobias and they show a threat symbol on them. While you are in the round, that counts as an additional symbol of that threat’s type. Good luck with that. If you have four Hard Knocks, beware! You are at risk of dying (and causing everyone to lose) if you are not Supported. More on how Support works in a bit.
You will, inevitably, find yourself in a position where you cannot play another card without failing the round (or don’t want to because ~strategy~). You do have other options than playing cards, namely:
- Use your Good Luck Charm. Flip your Character Card over to the non-four-leaf clover side. This lets you discard a card in play (not in your hand) with that threat on it. This is really good! But … it doesn’t regenerate on its own, so it’s kind of a one-use trick.
- Use a Speech Token. If you were previously a Mission Leader, you should have gotten a Speech Token (unless you ran out or there were … other cirumstances). If you have one, you can discard it from the game (to the box) and give a rousing speech (if you need suggestions, here are three) and then name a threat. Every player except you can discard a card with that threat from their hand, removing it from the game. Generally you’re not going to get everyone with this, but it’s still usually helpful.
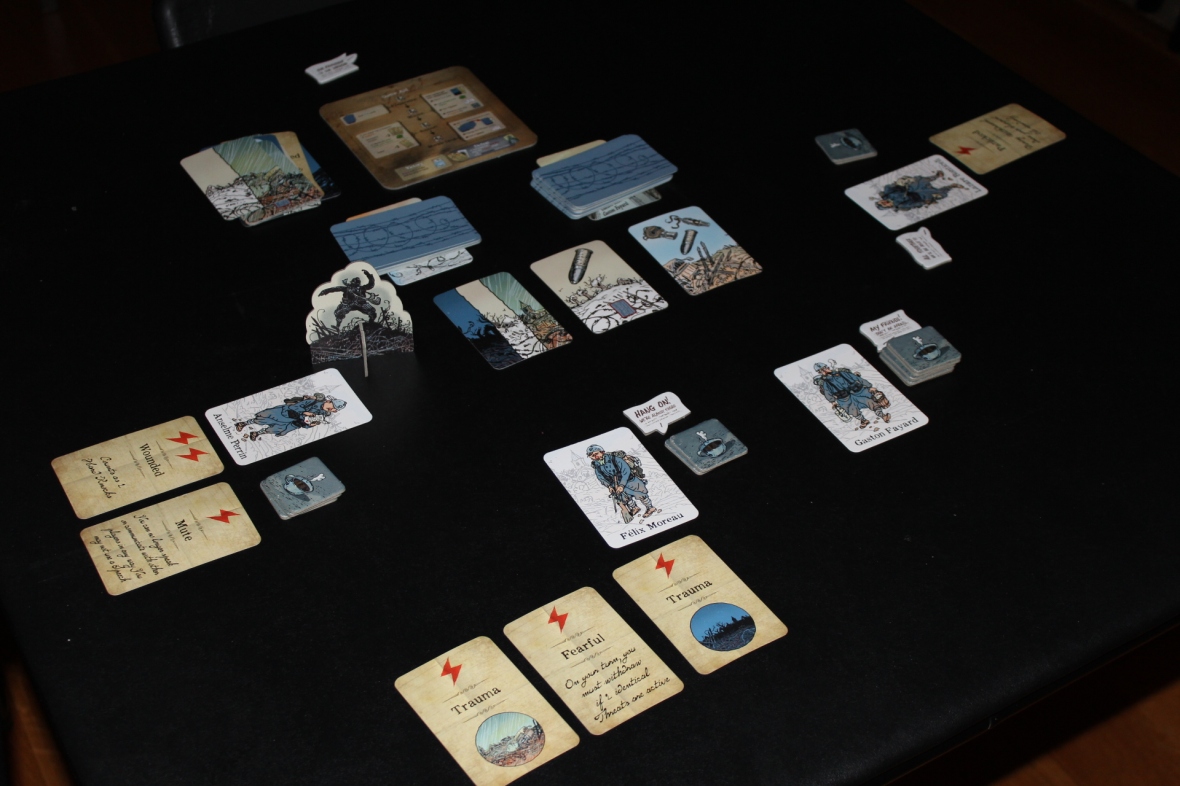
- Withdraw. Sometimes there’s no better option, and you need to exit the fight while you still can. If you choose this option, take one of your Support Tokens and place it face-down on your character card. You have withdrawn, and will take no more turns in this mission. You keep all the cards currently in your hand. Additionally, your Traumas, Phobias, and other Hard Knocks will no longer affect your teammates. That’s kind of important. Choose who you support wisely, as it will potentially let them regenerate their Good Luck Charm or discard some Hard Knocks, but you cannot tell anyone who you’ve supported. If you have no cards left in your hand (and no Good Luck Charm or Speech that you want to use), you must withdraw.
Once all players have withdrawn or three cards with the same threat has been played, the mission ends.
- If everyone has withdrawn successfully, the mission was a success! Which is great. Discard the played cards from the center and move on to the Support Phase.
- If three cards with the same threat were played, the mission fails! Not as good. Take all played cards and shuffle them back into the deck, so that your failures can eventually come back and haunt you.
- If everyone has played all their cards and the Peace Card is revealed, you win! Congratulations, you survived The Great War!
Step 3: Support
Success or failure, each player should now reveal their Support Token and give it to the player that they supported. Whoever received the most support tokens gets a special bonus at the end of the round:
- If the mission succeeded, they can either discard two Hard Knocks or regenerate their Good Luck Charm.
- If the mission failed, they can discard one Hard Knock.
- If there is a tie for most supported, no player receives any benefit. Try to avoid this one; it’s almost certainly not what you want to happen.
Step 4: Morale Drop
First, check all players. If any player still has four Hard Knocks in front of them at this point, they succumb and you all lose! That’s pretty bad.
Next, count the number of cards that each player has in their hand. Take the sum of that and move that number or three (whichever is greater) cards from the Morale Deck to the Trials deck. (You will always move at least three cards, unless otherwise stated.) This represents a Morale Drop for all players (war is hell, after all). Now, if you’ve revealed the Monument Card, you all lose! That’s a bummer too.
Pass the Mission Leader token to the next player, and restart at Step 1. Good luck! Continue play until you win or lose.
Player Count Differences
There is a slight difference at two players: The Trial Deck starts at 20 cards, rather than 25, and you add in The Chaplain. He’s a third character (with his own Support Tokens!) that immediately withdraws before entering a Mission (basically only there to randomly break support ties). If, for some unknowable reason, you manage to both support the Chaplain (so he wins the Support), you just … gain no benefit. He does keep both tokens, though. So try not to do that.
Other than that, you’ll notice that the missions become slightly easier themselves at < 3 players, since if you do 1-card missions you’ll eventually empty the deck, but you’ll start the game with more cards, so it’s kind of a trade-off. I cannot say that I prefer it with any player number, though I haven’t tried it at two. Supposedly the upcoming expansion is going to have options for Solo Play…
Strategy
So, I’m gonna be real. This game is tough. Therefore, I can only offer you so much when it comes to strategy.
- When in doubt, withdraw. Discretion is the better part of valor, they say, and you’d much rather live to fight another day. Sure, you may end up with two or three cards still in your hand, but it gives you the opportunity to at least clear out a few cards by having the mission succeed and then play what’s in your hand another round.
- Do not fail missions, but especially DO NOT FAIL THE FIRST MISSION. If you’re playing on Normal (with traps), you’re basically screwed if you fail the first mission. Even on the Rookie difficulty, you will still have a tough time winning, in my experience. This is made worse by the fact that you usually have the most cards in hand + have used your Good Luck Charms on the first mission, so subsequent rounds will be much more difficult.
- When playing a Trap Card, make sure it is impossible for the next drawn card to fail a mission. This might seem obvious, but we all have made mistakes before. You do not want to fail a mission off of a trap card, so make sure you’re safe no matter what comes up next. I generally advise people to play Trap Cards as the first couple cards of a mission, or hold them until the next mission.
- Know your limits. Assuming you play perfectly, with six different types of hazards and a limit of three, you can only play six cards to the center before people will have to withdraw. Keep that in mind before you select a Mission Difficulty, as really any more than two cards will ensure that you cannot empty your hand. Hard Knocks may increase that limit, but it’s not always worth playing them…
- Sometimes it is much better to save a Hard Knock than play it. Fragile, for instance, is one of those Hard Knocks, as it affects the ability of other players to withdraw and can very quickly lose you matches. Clumsy is another.
- Speaking of saving, don’t save your Good Luck Charms. Using your Good Luck Charms is key to getting through the first mission, and you might get lucky and be able to regenerate it later. Whether or not you’ll want to, however, is a different story.
- As might be obvious, Speeches and Good Luck Charms should, when given a choice, be used to get rid of trap cards first. Trap cards are the worst, and should be discarded immediately. The only exception is cards with more than two threats on them.
- Know who to support. You should be keeping an eye on other players and watching how many Hard Knocks they collect. If you can, support the player with the “worst” Hard Knocks (Fragile, Clumsy, early-game Tyrannical, Frenzied, Traumas, Phobias) so that they can get rid of them. Sorry, Mute, but that’s not really that bad.
- Figure out how to use your Speeches effectively. For most people, if you Speech a threat, it’ll probably be whatever threat you have the most of in your hand (since you’ll ultimately have to play those cards, since your Speech doesn’t effect you). This might mean that if enough people discard a card with that threat that the next Speech should be the same threat. Perhaps not. You need to find a playstyle that works for your group, but minimize table talk.
- My general difficulty strategy is to start with 3 cards, then do 1 until everyone has a Speech Token, and then do 3 again. This gives you the best opportunity to get rid of all the cards in your hand and then, once you have Speeches, you can take a bunch of extra cards to make sure that you have enough cards that you will discard cards for speeches. Generally your expected number of discards from speeches is 1-2 per Speech, so don’t expect to be dazzled.
- Play on Veteran at your own peril. My strategy advice is advice on how I think you should play to win games. Veteran is very hard (you start with 30 cards rather than 25). Therefore, don’t play on Veteran.
Pros, Mehs, and Cons
Pros
- If you ever want to experience “War is hell” as a board game, this really sells it. It’s pretty hard to win, you’re constantly inflicting pain on yourself or your team, and more often than not you’re gonna end up dead. As far as a theme goes, it really does well, there. Not sure that’s a pro for everyone, but it really does its theme well.
- Great art. It’s got a Roald Dahl’s illustrator-esque vibe to it (Quentin Blake, I just learned), and I’m a huge fan.
- Really easy to teach. It’s hard as hell to win consistently, but yeah, pretty easy to teach. It helps that I find cooperative games easier to teach than competitive games, since you can teach people rules in-the-moment for a bit better understanding, at times.
- Fairly short. Only takes like, half an hour to play.
- Stressful, but the good kind of stressful? Tense, I guess? It’s got a very good thing that most of my favorite co-ops have (Pandemic, Burgle Bros., Mysterium) where you’re really not sure you’re gonna win, and sometimes you get lucky and it’s awesome. It can be a bit stressful, but it’s pretty excellent.
Mehs
- Box is kind of an odd shape. I guess it’s to allow room for future expansions, maybe?
- The Support Tokens could be larger, if I’m allowed to nitpick. It’s a really nitty nitpick, but there you have it.
Cons
- Can be a downer. This is not Tokaido. It is not a particularly happy game, and that might not appeal to everyone. You will likely lose your first game, and that’s okay! It’s just not necessarily a theme that immediately attracts everyone.
- I generally don’t like cards that force out-of-game actions. The Mute Hard Knock forces another player to stop speaking or communicating with other players (and cannot use Speech Tokens), which I get the point of, but I personally am not a huge fan of. We have house-ruled it to “say as little as possible, but if you have a rules question you can say, ‘point of order’ and ask your question” to prevent catastrophes, since I got Muted our first game and I was the only person who had read the rules…
Overall: 8.75 / 10
Overall, The Grizzled is fantastic. It’s heavily thematic (both in a positive way and in a way that doesn’t compromise gameplay), it’s simple enough to learn, and it has a lot of replay value since you’re never quite having the same experience across any games. I feel like it’s a bit less expansive than, say, Burgle Bros. or Pandemic (just by virtue of being a smaller game), but it’s still one I’d highly recommend to people interested in cooperative games. While it might not be the sunniest or happiest choice, it’s still a potent little game with a lot of depth to it, and as a result I’d strongly recommend trying it.

I got to play this a few weeks ago. It wasn’t a bad game, by any means, but I just didn’t find it fun. Like you said that may be because it isn’t a particularly happy theme. I, personally, just didn’t feel that engaged when playing. My group actually won on our first playthrough, but I do see how it could be a loss for a first time through. Overall, I thought it was okay.
LikeLiked by 1 person
Totally fair! It’s not a theme for everyone.
LikeLiked by 1 person
We’ve lost like 6-7 games and didn’t play it more yet.. Very tough, though I like it a lot
LikeLiked by 1 person
Heh, good luck! Hopefully my advice is sound. 😃
LikeLike
ive heard a lot of positive things about the expansion”at your orders” which drastically adjusts the difficulty level to make the game more fun and accessible.
seeing as you’ve given it a crazy good review without incorporating the expansion, that 8.75 might increase even more!!
as you’ve breifly mentioned, my only gripe is with some of the hard knocks in the sense that multiple hard knocks can contradict each other and it’s troublesome to keep track of the detrimental effects. but otherwise great review, still eagerly awaiting your next lost legacy review!
LikeLiked by 1 person
I am really hyped for the expansion. And minor spoiler — I enjoyed the Fourth Chronicle even more. 🙂
Thanks for reading! I appreciate it.
LikeLike