
Base price: $30.
2 – 4 players.
Play time: 30 – 45 minutes.
BGG | Board Game Atlas
Check it out on Kickstarter!
Logged plays: 2
Full disclosure: A preview copy of Rivet Heads was provided by New Mill Industries. Some art, gameplay, or other aspects of the game may change between this preview and the fulfillment of the Kickstarter, should it fund, as this is a preview of a currently unreleased game.
How quickly we exit the Kickstarter carousel, only to hop right back on with reckless abandon. We love the Kickstarter carousel, in its own way. Anyways, there were a few early in the year, then I took a break to move, and now I’ve got four scheduled in about a month or so. Exciting times. Actually I think it’s five, now that I’m looking at my calendar again. This is how we do that. Anyways, next game up is from Tony Miller, who also just had Kabuto Sumo on a fairly recent Kickstarter. He’s working with Daniel Newman of Dead Man’s Cabal / general skull fame on New Mill Industries, which published The Science and Seance Society a little while back. Let’s see what this next game has to offer!
In Rivet Heads, you’ve long since learned that you don’t need to fix what isn’t broken in the Sprawl. Problem is, everything’s kind of broken, even your crew. So you’ll need to get your Squad together and fit them with the latest upgrades if you want to impress the other crews in this wasteland. Plus, they can get you fitted for gills, and who doesn’t kind of want gills? I guess the people with cybernetic enhancements, since they famously don’t go together well, but what can you do. You’ll have to manage your market well and plan a bit ahead if you want to make your crew happy, so what do you say? Do you have what it takes to complete all your squad goals?
Contents
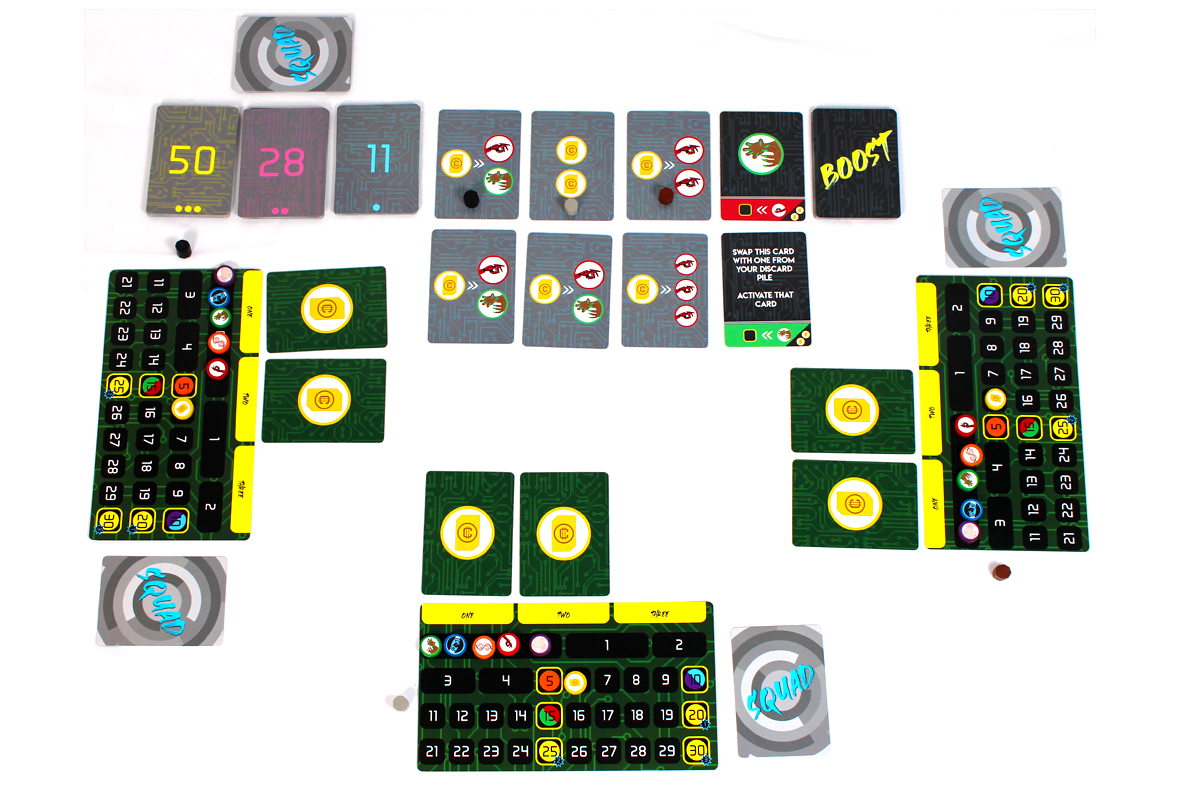
Setup
Give each player a player mat:

Next, give each player some of the tracking discs (each player should get one of each of the six colors):
Place all of the discs on 0 except for the yellow Credits disc, which should go on 6. Each player also gets two Credits cards:

They get placed above the “Two” and “Three” slots on the tracking mat. I think I goofer’d and put them above “One” and “Two”, but that … theoretically has the same gameplay effect, so, what can you do. Now, sort the three sets of Cycle cards by their Cycle (color / number of dots on the back):


Each Cycle should be shuffled separately. Remove the cards with 2 and 3 stripes in the top-right corner for a two-player game, and remove the cards with 3 stripes in the top-right corner for a three-player game. Take four cards (two- / four-player game) or three cards (three-player game) from the Cycle 1 deck and place them face-down in a row. Sort them into increasing order and then reveal them. Next, add a card from the Boost deck to the right of the row:

Also, deal each player a Squad card; they should not reveal that until the end of the game (but they can look at it).

Give each player a set of player markers in one color:

Randomize them to determine the player order. Each player will place one marker on an unoccupied card in the row, in player order. In a two-player game, once you’ve determined player order, start player places, then their opponent, then start player, then their opponent. You may place on the Cycle 1 cards or on the Boost card, if you want. After each player has chosen a card, deal another row of Cycle 1 cards and a Boost card below the initial row; that’s going to be the Future Row.
Once you’ve done that, you should be ready to start!
Gameplay

A game of Rivet Heads takes place over a series of turns. Each player goes when their player marker is the leftmost marker in the Current Row. When it’s your turn, take the card with your player marker on it and place it above slot “One” on your player mat. If it has a Push side, you can flip the card 180 degrees and add it Push side up, or you can place it Action side up.
Next, move your Marker from the card you just took to any unoccupied card in the Future Row. Again, you can take the Boost card, but that means you’ll definitely go last, next round.

Now, it’s time to activate your assembly line! Each card activates its effect, from “One” to “Three”. If you don’t have a resource to spend, the card does nothing. If you’d prefer the card not activate because you don’t want to spend the resource, flip the card over, permanently. After activating the “Three” slot, discard the card in the “Three” position and slide the other cards to the right to fill that slot. If the card is an Action card, place it in a personal discard pile near your player mat. If the card is a Push card, place it in a Storage area for later.
If all players’ markers are now in the Future Row, discard the undrafted card (unless otherwise stated) and slide the Future Row up to become the Current Row. If there are no more cards in the current Cycle, use the next Cycle deck and create a new Future Row.
If Cycle 3 runs out of cards, well, the game’s basically over, at that point. After all cards have been taken, continue activating your Assembly Line (and removing the rightmost card after doing so) until every card has left your Assembly Line. Then, scoring!

Scoring
During Scoring, you have three things to do. First, check your Squad card. If you have the resources indicated on your Squad card, you gain points for each Squad member whose requirements you fulfill. Note that these requests are cumulative, so if one Squad Member wants 3 DNA and another Squad Member also wants 3 DNA, you need to have a total of 6 DNA in your storage to satisfy them both. Note that you do not spend these resources; you simply have them or you don’t.
Once you’ve checked with your Squad, it’s time to Push! If you have Storage cards with Push icons on them, you may be eligible to Push your resource of that type to the next tier! You can only Push once per card, and you can only Push if you’ve got at least as many of that resource as the requirements:
- Arms / Claws: 15 to Push
- Eyes / Gills: 10 to Push
- DNA: 5 to Push
After Pushing, check to see if you have any resources at or exceeding 20. If they are at 30, you get 3 points; if they exceed 25, you get 2 points instead, and if they only exceed 20, you get 1 point.

One last check! Now check to see which players have the most of each Upgrade. If you have the most, you get bonus points!
- Arms / Claws: 3 points for most, 2 points for 2nd most, 1 point for 3rd most.
- Eyes / Gills: 3 points for most, 4 points for 2nd most, 2 points for 3rd most.
- DNA: 10 points for most, 7 points for 2nd most, 3 points for 3rd most.
Total your points, and the player with the most points wins!
Player Count Differences
One thing you’ll notice in games with more players is that there’s just more contention for certain card types and strategies, as there are more players with Squads that need resources. That said, there are also better cards around (more efficient ones). That makes higher player counts a bit more doable, in my opinion. The player turns are short enough that I don’t really notice much downtime, though I imagine that there’s a lot more opportunity to get booed by other players if you take the card that they have their eye on! That said, this is a smooth engine of a game and it moves pretty quickly, once it gets rolling. The only thing that doesn’t increase in kind are Boost cards, so keep an eye on those and make sure to grab the one that works best with your strategy if you see it come up (and you can do so!). Beyond taking cards, though, you can’t adversely impact another player, so you’re not really interfering or interfered with at any point unless they take the card you want (which, granted, can really mess you up). Thankfully, Push sides exist so that a bad card or two don’t throw your entire engine into disarray. This is actually probably one of the smarter things about the design of this game, in my opinion; by offloading most of the player work into the Assembly Line, you really can stagger player turns so that there’s very little downtime, which means that this scales nicely with player count. And that’s a good thing! As a result, I don’t have any real preference on player count; I think it’s pretty smooth regardless.
Strategy
- As with most games that have money in them, don’t run out of money. This can really mess you up, if you’re not careful. Essentially, your current starting money and starting assembly line will give you a total of 9 money; that’s enough for three cards that take your money before you’re out. You really need to have at least one income source revved up before that happens, or you’re going to stall, very hard. If you stall early in the game, it becomes almost impossible to get the resources you need in order to deliver on late-game resources. This means your Squad isn’t satisfied and you can’t end up with the most of certain resource types. That will generally cost you, big-time. Instead, focus on balancing your spending against making enough income to continue staying in the game.
- Prioritize the cards that give you the best return on your investment, if you can do so. There are definitely cards that have more return efficiency, like a card that produces three Claws for one credit instead of one or two Claws. Even if you think it’s going to cost you on turn order, that might be worth grabbing for the sheer economic value. You’re going to need to run a very tight engine if you want to fulfill your Squad’s demands before the end of the game, and every credit might end up counting.
- There’s a progression of resources in this game; make sure that you take advantage of it. Credits produce resources in Round 1, Round 1 resources generally convert to Round 2 resources, and Round 2 resources can be used for Round 3. If you’re looking at 6 DNA as a requirement for your Squad, you better make sure you’re producing enough in the earlier rounds to deliver in the final one. That’s most of the game, thinking about how your plans now will matter in later rounds and trying to get the cards you need to keep your engine moving without issue.
- There are a few cards every round that reverse that progression, essentially, and they’ll let you play catch-up if you partially goof yourself. Mid-game, there are a few cards that will give you credits, so that in the final round, you can spend them for a huge boost to your Round 1 resources. This is especially helpful for players that spent too many Round 1 resources on Round 2 resources, so make sure you can get your hands on one of those! Or maybe just take them to keep them away from your opponents?
- Getting some Boost cards can be an interesting way to change things up. The Boost cards can be wildly helpful, from giving you resources for free to allowing you to take undrafted / discarded cards and add them back to your Assembly Line. Got a great card that you feel like left this world too soon? Try getting a Boost card to let you add it back to your Assembly Line. This is a critical way to make progress in basically any round, provided you got a high-efficiency card.
- Prioritizing your Squad can be good, but think of the various Squad members as individuals, rather than as a cohesive unit. Basically, there’s no partial credit. It’s not worth saving some Claws now if you’re not going to be able to get enough Gills later to make that Squad member happy. If that’s the case, then focus on the needs of the Squad members you can fulfill, so you make sure you get 6 points instead of a partial set of Squad satisfactions that leave you with a big 0.
- If you’re making good progress on resources, work on prioritizing some Push cards. As you near the end of the game, you should start thinking about Majorities in addition to your Squad’s needs. You get bonus points if you have the most of a resource, and you get there with Push cards, since they let you jump up to the next yellow box on the tracker. This means you’ll get fewer resources, but that may not matter if you’ve already met your goals or you just really want to try and get that 10 point DNA majority.
- You can occasionally gain resources from the Push cards, but don’t depend on that to maintain your levels. Yeah, you get 1 – 2 resources, tops, from a Push side of a card, and it’s not every round; it’s literally one time. You should not be leaning on those if you really want to try and make up a big gap. Now, if you need a slight push to get from 8 to 9, those cards can help.
- You can also ignore / burn cards from your Assembly Line, if you need to. It may be worth it at the end of the game if you need to thread a needle on a resource value. Rather than converting it to DNA, you can just flip the card over and stop using it in your Assembly Line. Keep that in mind. If you run out of a resource, however, it can stay face-up until you get more of that resource.
Pros, Mehs, and Cons

Pros
- The core mechanic is pretty interesting! I really like the assembly line mechanic, honestly. It requires you to plan a bit ahead and try to execute on plans on some semblance of a timetable, but it’s not quite as aggressive as full-on action programming. I’m not a big programming guy, but I like the planning and strategy aspects of this. I think Rivet Heads does a good job building a game around the assembly line, especially because you have to manage making sure that your resources don’t run out (with the addition of being able to partially replenish those resources since everything in your assembly line activates once on each of three turns). Failing to do so and having to try and correct for any errors made in your planning is particularly interesting, as is weighing which goals you’re going to shoot for. It’s rarely possible to do everything, and challenging players to prioritize in the long-term always creates an interesting bit of tension.
- The game is very colorful. It’s got a bit of everything, which breaks up the gray and black. That’s good!
- I really like the market organization being by card number; it’s a simple way to balance out the quality of cards against turn order. It can still make some of your rounds a bit odd, since there’s some variability of the market cards even within their number bands, but it makes up for it with turn order! I think that’s a nice compromise. The “best” cards in a round are towards the end (but still ahead of Boost cards), but even then there might be some rounds in which there are only “good” cards or not-so-good cards. It does a nice job mixing up each round and not incentivizing players to stagnate in the same player order for the entire game. It’s a bit … explicit in letting you see behind the curtain, mechanically speaking, but that’s fine.
- Randomizing the Boost cards is interesting as well, since they can really sequence break. The randomness of them means that you might get late-game perks early in the game or vice versa (or you might get the 5-credits card when you’re still trying to make purchases, incredibly), and that makes things a bit exciting. Is it worth taking a massive gain in exchange for the turn order penalty? Hard to say!
- Each turn plays pretty quickly, in terms of decision-making. You’re really just choosing one card; once you’ve done that, the next player can take their turn while you process your assembly line changes and modifications. That keeps the game moving at a pretty good clip.
- The graphic design is simple enough to make things clear. This is largely since the cards are “lose one resource to gain another”, and that’s helpful enough. It would be helpful if the halves of the card were a bit more separated; towards the end of the game there are cards with four or five icons on them that would benefit from a bit more space.
- The ability to push cards to the next tier is pretty interesting. I like it as a backup strategy and it tends to work pretty well! It’s very helpful if you’re trying to get those big points on having the most of certain resources by game’s end, as well. Try to use it to edge out your opponents!
Mehs
- It can, at times, feel a bit like “you turn number into number into number”. To be fair, that is most of the game, since you’re converting credits into primary resources, primary resources into secondary resources, and secondary resources into tertiary resources. It helps that the core game loop moves pretty quickly, but if you’re not excited about specifically resource management and conversion, well, this may not be your particular cup of tea.
- As a result, I don’t quite feel the theme of the game come through, as much. It’s hard for me to get engaged with pure resource management, and while I like the Squad cards a lot (since any impact to your ability to get resources can cause massive chain reactions), I haven’t found myself able to really engage with the game thematically.
- I guess you can use the player mats to track points? A scoreboard would be nice considering we’re totaling points from fourish different scoring areas.
Cons
- I think my major complaint about the game is that I really want more from it. This isn’t really as bad of a complaint as it sounds, frankly. Take, for instance, Factory Funner, a game that I love. It is also very much a “turn X -> Y -> Z” sort of game. It disguises that somewhat with some real-time elements and the actual factory-building component, each of which are fun in its own right. Rivet Heads, while interesting and compelling, makes me kind of want a bit more around the core mechanic of the game. It’s not quite action programming as much as it is kind of resource programming. The assembly line mechanic is really neat! I just wish the game were a bit meatier around it to support it. As it stands, the game takes a bit too long for it to be a one-mechanic kind of game, and the complexities around the Push cards add to that.
Overall: 7 / 10

Overall, I think Rivet Heads is pretty fun! I will freely say that I think it’s a solid design that feels a bit limited by its current format, as it moves quickly enough but it’s hard to engage with at a deeper level than “resource becomes resource becomes resource”. That takes me out of the game a bit because I spend time thinking about the game abstractly, rather than engaging with the theme. That’s fine, but I kind of wish I could engage with the theme more. Maybe if the Squad were named? Not sure. For me, this feels a bit like how Kingdomino was a foundational game for Queendomino to try out the mechanics in a simpler framework. And Kingdomino is super fun! I actually prefer it to Queendomino. In this case, however, I kind of want to see what Tony has in mind for a larger game that uses the same Assembly Line mechanic as Rivet Heads. I think it could be really cool! This probably sounds like I’m down on Rivet Heads, but I don’t think that’s entirely the case, either. It’s fun in a way that makes me want to see how someone could iterate on this and get even farther. It’s got a solid mechanic in the limited programming that you need to do, and that makes every turn interesting because you have to be able to think a bit ahead to what options you’re creating for yourself. You also need to manage the changing of the rounds to make sure you’re well-set for your final plans to come to fruition. It’s a short game for fans of planning, and that’s cool! I particularly like the Boost cards as sequence breakers, since you never know what will come out of that deck and when. It can really help you at a critical time or be utterly useless, but that doesn’t necessarily mean it’s always worth going first to have a shot at it! The tension there is interesting. Either way, this is all to say that I think Rivet Heads is an interesting game, and if you’re looking for a short, thoughtful game that rewards your ability to plan and execute, I’d recommend checking Rivet Heads out!
If you enjoyed this review and would like to support What’s Eric Playing? in the future, please check out my Patreon. Thanks for reading!
Discover more from What's Eric Playing?
Subscribe to get the latest posts sent to your email.